この記事はGameWith アドベントカレンダー2023 の18日目の記事です
qiita.com
サービス開発部のdanaです!
現在担当しているプロジェクトでは、スプレッドシートに入っているデータを用いて、DBにデータ登録するAPIを呼び出し入稿を行うシステムがあります。
このシステムは全レコードの更新を行う仕組みになっています。
そのため特定の1レコードの登録/更新を行いたい場合は対象フラグのカラムを設定することでJSでフィルタ対応することもできるのですが、毎度データ修正を行うのが面倒です。
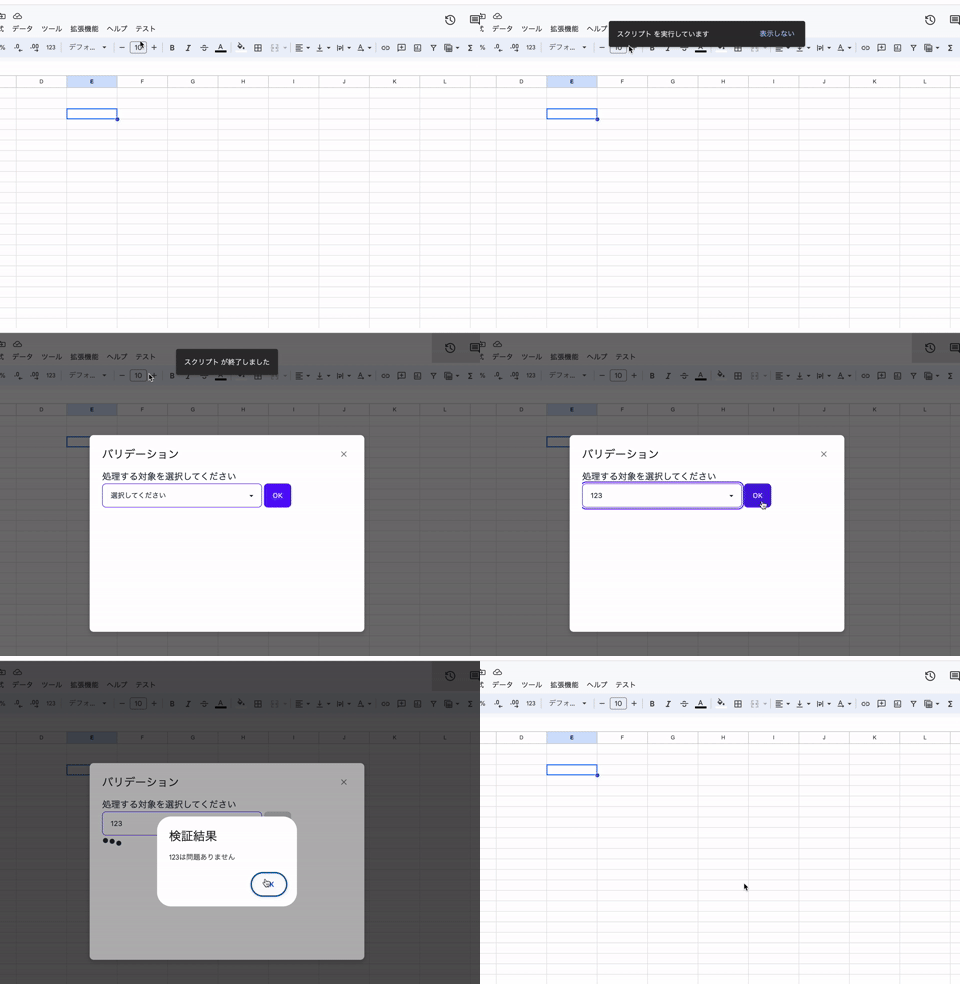
今回は対象となるレコードをGUIで選択できるようにしてみました。
実装概要
今回は例として2つのファイルを作成します。
1つはセレクター用のテンプレートHTMLである selector.html。
もう一つ実行用のapp.jsです。
GAS(Google Apps Script)では独自のダイアログやサイドバーをテンプレートHTMLを用いて作成する事ができます。
このテンプレートHTMLにはパラメータを渡すことによって表示内容を更新することが可能でMVCのViewのようなイメージで利用できます。
developers.google.com
データの受け渡しはJSで対象となるデータリストを作成し、HTMLのselect要素に設定します。
submitが呼び出された際にselectの内容をコールバックにそのまま渡して、その後の処理をJSで行います。
selector.html
<!DOCTYPE html>
<html>
  <head>
    <base target="_top">
    <link href="https://cdn.jsdelivr.net/npm/daisyui@3.9.4/dist/full.css" rel="stylesheet" type="text/css" />
    <script src="https://cdn.tailwindcss.com"></script>
    <script>
      // Prevent forms from submitting.
      function preventFormSubmit() {
        const forms = document.querySelectorAll("form");
        forms.forEach((form) => {
          form.addEventListener("submit", function (event) {
            event.preventDefault();
          });
        });
      }
      window.addEventListener("load", preventFormSubmit);

      // コールバック処理後は閉じるようにしていますが、ここも任意の関数が渡せるようにすれば拡張性が上がると思います!
      function onSuccess() {
        google.script.host.close();
      }

      function onFailure(error) {
        const alert = document.createElement("div");
        alert.setAttribute("class", "alert alert-error");
        const alertMessage = document.createElement("span");
        alertMessage.innerText = `[Error]処理に失敗しました。ページを更新して再度お試しください。 (${error.message})`;
        alert.appendChild(alertMessage)
        document.body.appendChild(alert);
      }

      function handleFormSubmit(formObject) {
        document.getElementById("submit-btn").setAttribute("disabled", "disabled");

        const loading = document.createElement("span");
        loading.setAttribute("class", "loading loading-dots loading-lg");
        document.body.appendChild(loading);
        google.script.run
          .withFailureHandler(onFailure)
          .withSuccessHandler(onSuccess)["<?= callback ?>"](formObject); // ここで渡されたコールバックを設定します
      }
    </script>
  </head>
  <body>
    <h2 class="text-lg">処理する対象を選択してください</h2>
    <form id="selector" onsubmit="handleFormSubmit(this)">
      <select name="name" class="select select-primary w-full max-w-xs">
        <option disabled selected>選択してください</option>
        <? for (const value of selectValues) { ?>
          <option><?= value.name ?></option>
        <? } ?>
      </select>
      <button id="submit-btn" class="btn btn-primary">OK</button>
    </form>
  </body>
</html>
HTML側はローディングなどを楽に実装したかったためtailwindとdaisyuiを利用しています。
daisyui.com
app.js
// スプレッドシートに実行用の項目を作成します
function onOpen() {
  SpreadsheetApp.getUi().createMenu('テスト').addItem('バリデーション', 'validation').addToUi();
}

function showSelectorDialog(selectValues, title, callbackFunctionName) {
  const ui = SpreadsheetApp.getUi();
  const htmlOutput = HtmlService
    .createTemplateFromFile("selector");
    htmlOutput.selectValues = selectValues;
    htmlOutput.callback = callbackFunctionName;

  // evaluate()を実行しないとテンプレートが機能しません
  ui.showModalDialog(htmlOutput.evaluate(), title);
}

function validation() {
    // 今回はA、Bカラムの内容をobjectとして持ったものを渡す形で記載しています
    const list = [{id: 1, name: "abc"},{id: 1, name: "123"}, {id: 1, name: "hoge"}];
    showSelectorDialog(list, "バリデーション", "callbackValidation");
}

// データ検証コールバックの例です
function callbackValidation(formObject) {
  const name = formObject.name;
  // 実際にはフォームから受け取った名前でレコード内容を取得してバリデーションする実装を用意します
  // 今回開発したものはAPIを呼び出してサーバー側でのバリデーション結果を返しています
  const validateByName = (name) => true;
  const isValid = validateByName(name);

  const ui = SpreadsheetApp.getUi();
  if (isValid) {
    ui.alert('検証結果', `${name}は問題ありません`, ui.ButtonSet.OK);
    return true;
  } else {
    const errorMessage = ret.response.getContentText();
    const parsed = JSON.parse(errorMessage);
    const message = parsed.message;
    console.log(errorMessage)
    ui.alert('検証結果', `${name}には不備があります。\n${message}`, ui.ButtonSet.OK);
    return false;
  }
}
動作イメージ

※初回実行時に権限が要求されることがあります!
まとめ
今回はGASを利用して特定のレコードに対して処理を行わせるダイアログを作成した話をご紹介しました。
リストとコールバックを渡す関数を用意して、uiから呼び出せるようにすれば様々なダイアログが汎用的に利用できます。
フォームの内容を書き換えれば複数パラメータや入力が行えるようなものも作成できますので是非お試しください!
GameWithではエンジニアを絶賛募集中です!
サーバーエンジニアやフロントエンジニアの方、AIに興味がある方や、Unityでの開発に興味がある方は是非GitHubの採用情報まとめをご覧ください!
カジュアル面談もお待ちしております!
github.com